Tableau – Implementing row-level security using – Create User Filter
The – Create user filter – feature in Tableau desktop can be used implement row-level security to display filtered information based on logged in user authorization. This means that same Tableau dashboard will display only central region information for central region manager while the same dashboard will display eastern region information for the eastern region manager.
Key Concepts
By reading this article you will:
- Learn how to apply security on the Universe level using the security editor in the SAP Information Design Tool
- Learn how to assign the created profiles to specific users or groups of users
See a demo video demo for using the security editor to create different security profiles
Tableau Version: 10.X
Menu Path: Server –> Create User Filter
Shortcut: None
Introduction:
Follow these step-by-step instructions to learn how to implement row-level security in Tableau using the “Create user filter” feature which is the out-of-the box solution introduced by Tableau version 10.X.
You will learn how to:
- How to use “Create User Filter” Feature to create an impeded filter for
- Tableau User(s)
- Tableau Group(s)
- Configure multiple filters based on different dimensions for each Tableau user / group
- Find out how this will affect Tableau user / group member when accessing the workbook information.
You can watch this YouTub video or follow up the instructions below:
Note: You need to have access to Tableau server to follow up with the instructions in this article or you can create Tableau online free trail account which will last for 14 days.
Before we start, let’s walk through the following business scenario. In this example, let’s say that you have a monthly sales-by-Country Tableau Dashboard that is used to track regional sales as well as branch sales for each country. For this dashboard, let’s say that there are three different countries (USA, Canada and Mexico) and we have three different country managers. Each country managers should have access this dashboard. They need to be able to drill down to the branch level, and each Country manager should be able to see his or her own region’s performance ONLY. All country managers should use same Tableau dashboard, but the dashboard only displays relevant region information based on the logged-in Country manager’s credentials.
Step # 1: Connect to Data source and get prepared
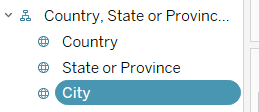
So let’s get our hands dirty; download the attached “Super Market Retail” Excel file and establish a new data connection to this excel file. Make sure that you prepared the data in data source windows by setting the proper geographic role for (Country, Region and City). They should be identified as geographical dimension marked with the Glob icon beside.
 Step # 2: Connecting to Tableau Online Server
Now, let’s create a very simple Tableau map visualization to show “Revenue” by “Country”
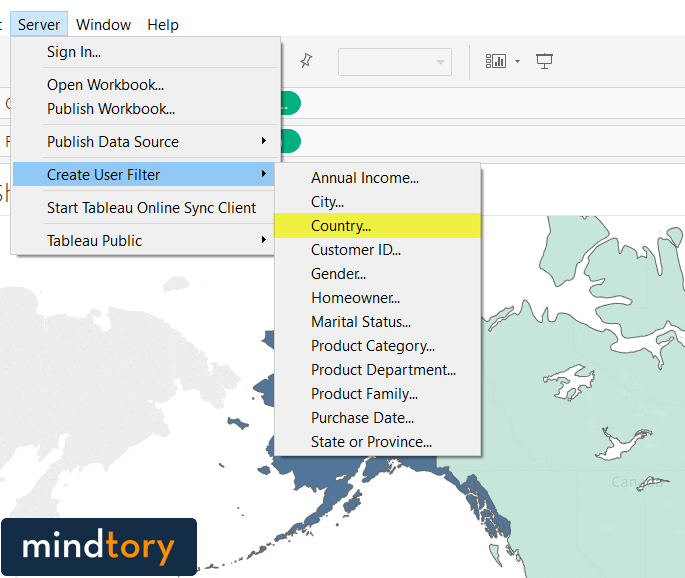
Now go to “Server” menu and navigate to “Create User Filter”. Select “Country” from the menu list. This will allow you to create a user filter based on Country filed.
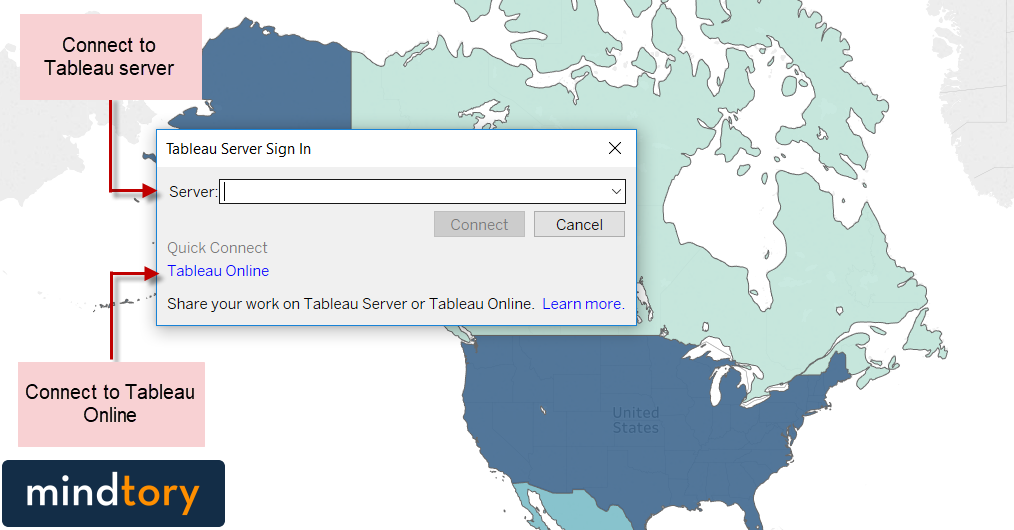
 If you are not already signed to a server; Tableau will ask you to login to server first. This is a mandatory step as Tableau need to download list of the created Users and Groups from Tableau server to allow you to start assign filters for each Group member or specific user. Enter Tableau server name or URL and hit enter.
Note # 1: you can download Tableau server from www.tableau.com and install it on your machine. This will give you 14 days’ free trial period for Tableau server. OR
Note # 2: If you don’t have access to Tableau server or you don’t want to hassle with server installation; you can register on Tableau site and get 14-day trial period for Tableau online. Tableau online is a Tableau server hosted on the cloud managed and maintained by Tableau. No installation or download required in this step.
 Mindtory – Tableau – Create user filter -Image # 2
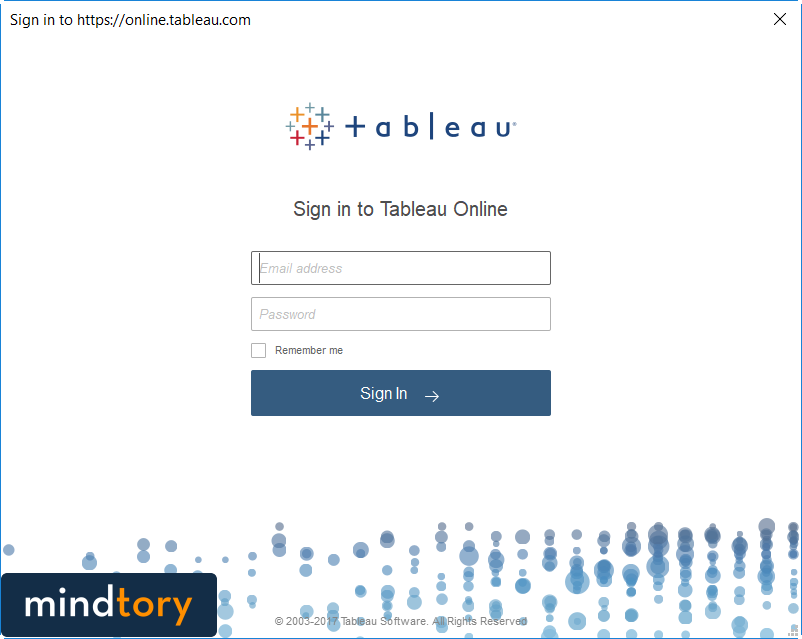
In this article I will use the 2nd option which is to connect to Tableau Online. So for now I will click on the “Tableau Online” link in the “Connect to Tableau server” window. The following “Sing in to Tabelau online” window will open and it will ask you for your user name and password. Please make sure that you have already registers in Tableau online using your e-mail and don’t forget to activate it by clicking on the activation link that you have received on your mail. The window looks like:
 Step # 3: Create user Filter
The “User Filter” window will open and as you can see; we have list of available users and groups on the left panel while we have the list of values for “Country” dimension. The window should looks like the following:
Note: All users are displayed as “Taha Mahmoud” because I have signed in using different users of min.
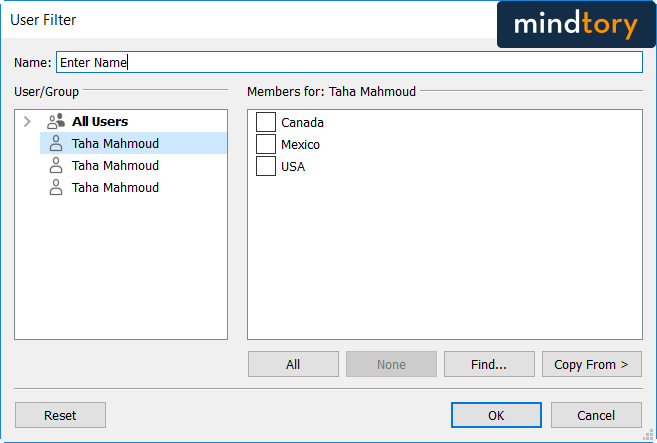 Let’s follow stpes below to create our first “User Filter”
- Type “Country for users” in the filer name.
- Select the first user and from the filter panel select “USA”
- Select user 2 and from filter panel select “Canada”
- Select user 3 and from filter panel select “Mexico”
Before we click on “Ok”; let’s just quickly explain the following option on the bottom:
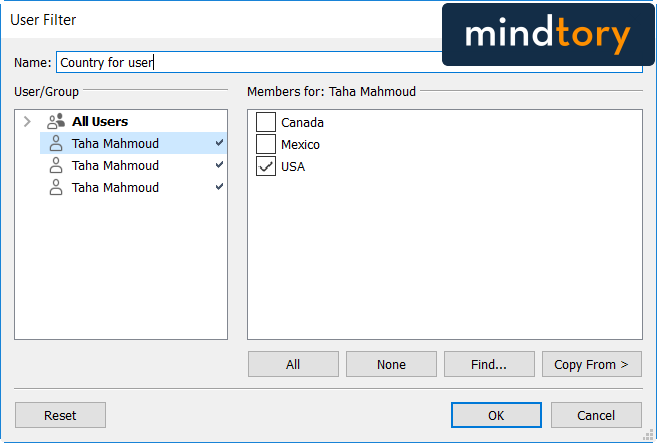 ALL: This will select all possible values for the selected user and for the selected dimension.
None: This will select None of values for the selected user and for the selected dimension.
Find: This will help you to reduce the items in the list if you have a large distinct values for the selected dimension. Let’s say “Branch” for example. In “Branch” case the list will return 100 of rows while in “Country” we have 3 only
Copy from: This feature can help to copy filters applied on specific user or group instead of starting from scratch. After that you can customize the copied filters for the selected user.
Note: In this example we created filter for users. The same will apply if we want to create filter for group of users instead.
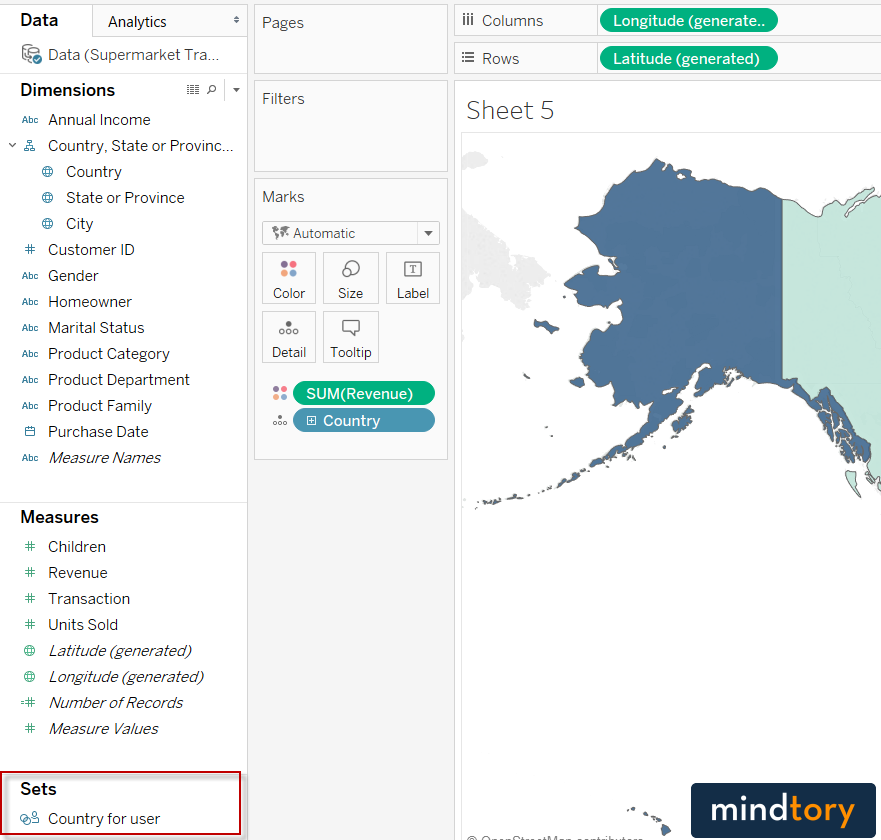
Step # 4: Apply the created filter and test the behavior
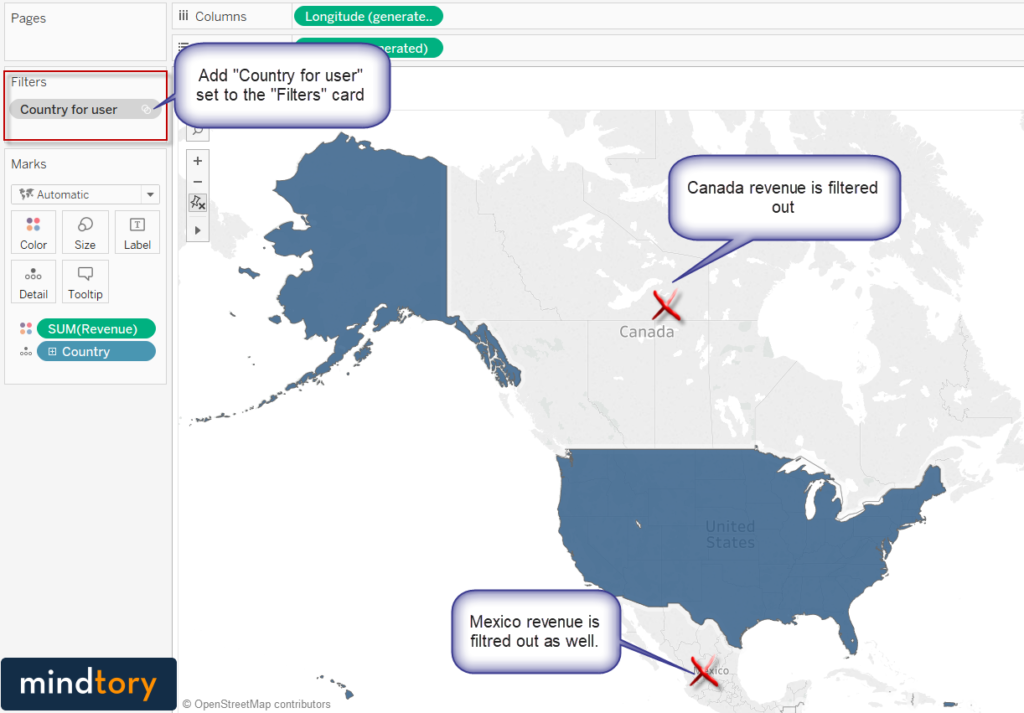
Now; click on “Ok” and you will notice that a new “Set” created with same filter name that we used. The next step is to drag the new created set “Country for User” to the” Filters” card to apply this filter on the required sheet. The other sheets (sheets without “Country for user” set been added to it’s “Filters” card will not be affected. The final output should be something like this:
 Note that because I’m logged in with the first user; I can see only “USA” revenue only. “Canada” and Mexico” revenue from the map.
 I will create another article to tell you about other options that you have in Tableau to apply row level security and create user based filters. In this article we just explained the most simple method to do this and it will apply on selected sheets, for selected users based on selected dimensions. We can do dynamic user filtering and data source filters which we will explain in details in the coming articles.